 By Lauren Holland
Learning how to make gift baskets for Christmas takes less time than most people expect. In a single afternoon you can plan a theme, gather a container and filler, arrange the items so they look full and balanced, and wrap the whole thing so it arrives looking finished. This guide walks through each stage in order, with checklists, a sizing table and a list of common mistakes to avoid.
A homemade basket has a real advantage over a store-bought one: you control every item, so you can match it to one person’s tastes. Whether you are building one basket or ten, the method stays the same. Start with a theme, then build outward from it.
Start With a Theme and a Recipient
Every good basket has a reason for existing. A theme gives you a filter for every item you consider, which saves money and keeps the basket from feeling like a random pile. Before you shop, answer two questions: who is the recipient, and what do they already enjoy?
Common themes that work well for Christmas include:
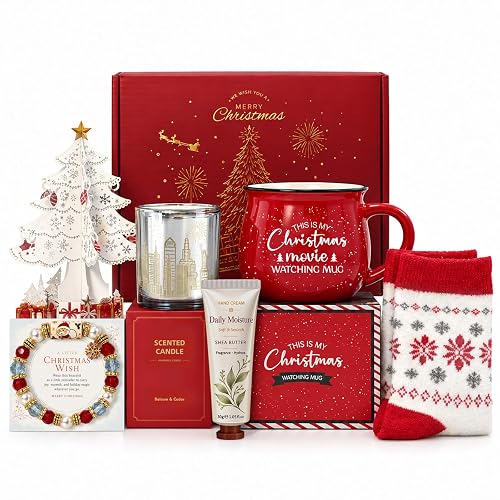
- Cozy evening: hot cocoa mix, a soft pair of socks, a candle, a paperback and a few peppermint bark pieces.
- Baker’s kit: a bag of good flour, vanilla extract, a bench scraper, a recipe card and a small bowl.
- Coffee lover: two bags of whole-bean coffee, a flavored syrup, a mug and a small bag of chocolate-covered espresso beans.
- Spa night: bath salts, a face mask set, a loofah, a scented candle and a hand cream.
- Movie night: microwave popcorn, a box of candy, a bag of licorice, cocoa and a set of coasters.
If you are not sure where to start, the broader catalog of Gift Basket Ideas: 12 Themes You Can Buy or Build in 2026 lists themes with item suggestions. For recipient-specific direction, Christmas Gift Ideas for Couples: 20 Gifts to Share and Kitchen Gift Ideas for Cooks, Bakers and Coffee Lovers are useful companions.
Choose a Container
The container sets the scale of the whole project. Pick it first, then fill it. The most common options are:
- Wicker or woven baskets: classic and forgiving. Their open weave can hide small gaps in your filler.
- Wooden crates: sturdy and modern-looking. Good for heavier items like jars and bottles.
- Tins or galvanized buckets: useful for cookies, candy and anything you want to keep dry.
- Mugs, bowls or cake pans: creative choices that double as part of the gift.
- Reusable tote bags: practical for people who will reuse them.
Look for a container with a flat base so it stands steadily. Avoid anything with sharp edges that could snag cellophane or ribbon.
Plan Your Items Using a Size Guide
One of the most common problems in homemade baskets is buying too many items for the container, which leaves nothing looking full, or buying too few, which leaves gaps. The table below gives a rough planning guide. These numbers are starting points, not rules, so adjust them for the actual items you choose.
| Basket size (approximate) | Number of main items | Filler needed | Best for |
|---|---|---|---|
| Small (about 6 to 8 inches across) | 2 to 3 | Light layer, about 1 to 2 cups | Coworkers, teachers, neighbors |
| Medium (about 10 to 12 inches across) | 4 to 6 | Moderate layer, about 3 to 4 cups | Family members, friends |
| Large (about 14 inches across or more) | 6 to 10 | Full layer, about 5 to 7 cups | Hosts, households, multiple recipients |
Filler can be shredded paper, tissue, crinkle cut paper, excelsior or even popcorn, depending on what is safe for your recipient. Plan for the filler to cover the bottom and reach about a third of the way up the sides before you place the main items.
Gather Your Tools and Supplies
Having everything on hand before you start prevents the frantic midway trip to the store that wrecks a good afternoon. Use this checklist:
- Basket or container, cleaned and dry
- Filler material (shredded paper, crinkle paper or tissue)
- Main items, checked for size and any expiration dates
- Cellophane or clear basket wrap
- Ribbon, at least 1.5 to 2 yards for a medium basket
- Scissors and clear tape or a hot glue gun for securing items
- A gift tag and pen
- A small card or handwritten note
Step-by-Step: Arrange the Basket
Step 1: Line the bottom with filler
Spread a layer of filler across the base. Press it lightly into the corners. This gives tall items something stable to sit on and stops everything from rattling around.
Step 2: Place the tallest or heaviest item first
Set the largest bottle, jar or box near the back or center. Heavy items low and centered keep the basket from tipping. If you have a tall item, lean it gently against the back wall of the basket.
Step 3: Build around the anchor
Add medium items on either side of the anchor, angling them so the labels face outward. Keep a rough triangle shape: tallest in the middle, shorter items sloping down toward the edges. This creates the full, layered look most people associate with a finished basket.
Step 4: Fill the gaps
Tuck smaller items, like candy, tea bags or ornaments, into the spaces between larger ones. Add more filler as needed until nothing shifts when you gently tilt the basket.
Step 5: Add a focal item
Place one item at the front center that catches the eye: a box of holiday tea, a candle with a bow, or a small plush toy. This is the piece people notice first.
Step 6: Check balance and stability
Lift the basket slightly and tilt it side to side. If anything slides, add filler or reposition an item. A basket that holds its shape when lifted will also survive the car ride.
Step-by-Step: Wrap and Finish
Step 7: Wrap in cellophane
Cut a sheet of cellophane large enough to cover the basket with at least 8 inches of extra on each side. Gather it at the top and check that the view of the contents is clear. If the basket is large or the items are heavy, wrap the cellophane carefully to avoid crushing the top layer.
Step 8: Tie the bow
Gather the cellophane at the top and tie it with ribbon. Use a double knot so it stays secure, then make a bow with two loops and two tails. Trim the tails at an angle. Leave a few inches of extra ribbon if you want to add a tag.
Step 9: Add a tag and note
Write the recipient’s name, your name and a short message on the tag. A handwritten note tucked among the items makes the gift feel personal.
Step 10: Store until delivery
Keep the finished basket in a cool, dry place away from direct sun and heat. Food items, especially chocolate, should stay out of the car’s warm interior. Deliver within a day or two if the basket contains perishables.
Tips for a Professional Look
- Use odd numbers. Groups of three or five look more natural than even counts.
- Vary heights and textures. Mix glass, fabric, wood and paper to create visual interest.
- Keep labels facing out. Turn bottles and boxes so the front shows.
- Add one unexpected item. A small ornament or a seasonal pinecone makes the basket feel custom.
- Match your palette. Choose two or three colors for ribbon and filler and repeat them in the items.
Common Mistakes to Avoid
- Skipping the filler. Without it, items shift and the basket looks sparse.
- Overpacking. A basket packed to the brim can bulge or tear the cellophane. Leave a little breathing room.
- Ignoring allergies and dietary needs. Check for nut content, gluten or caffeine before you add food. Ask the recipient if you are unsure.
- Forgetting the weight. Heavy glass jars in a thin wicker basket can crack the base. Use a sturdier container for heavy items.
- Mixing perishables with non-perishables too early. Assemble perishable baskets as close to delivery as you can.
- Buying everything at once. Shop in stages so you can spot better deals and avoid duplicates.
If you are building baskets for multiple people, it helps to keep a simple list of what each recipient is getting. 100 Christmas Gift Ideas Sorted by Recipient and Budget can help you plan across a long list, and DIY Christmas Gift Ideas: 15 Homemade Gifts People Actually Use offers homemade fillers that stretch a budget without sacrificing quality.
Recommended gear
A few inexpensive supplies make the assembly and finishing steps easier. Here are four worth considering.
- Crinkle cut paper filler: Lightweight and easy to tuck around items, it fills space without adding weight. View on Amazon
- Clear cellophane gift wrap sheets: Clear wrap lets the contents show while protecting them from dust and moisture. View on Amazon
- Wired ribbon: The wire holds its shape, so bows stay full and do not flatten during transport. View on Amazon
- Mini hot glue gun: Useful for securing heavy or wobbly items to the base or to each other. View on Amazon
FAQ
How far in advance can I make a Christmas gift basket?
Non-perishable baskets can be assembled up to two or three weeks ahead and stored in a cool, dry place. Baskets with fresh or highly perishable items should be assembled one to two days before delivery.
How much does the basket need to be filled to look full?
A good rule is to fill the basket so the contents sit about one-third to one-half of the way up the sides, with filler covering the base. Adding a focal item at the front helps the basket look full even when there is less overall volume.
What is the best filler for a Christmas gift basket?
Crinkle cut paper and shredded tissue are the most common choices because they are light, colorful and easy to arrange. For food baskets, choose a filler that is food-safe and tell the recipient what it is made of.
Can I use a plastic container?
Yes, though a basket or crate usually looks more gift-like. If you use plastic, cover the outside with fabric or wrapping paper so the container does not show.
How do I keep food items fresh inside the basket?
Seal snacks in airtight bags or tins, and keep chocolate and baked goods wrapped separately from the filler. Store the finished basket in a cool room, not in a hot car or near a heater.
What should I do if the basket is for someone with allergies or dietary limits?
Ask the recipient or a close family member for a list of restrictions before you start. Check each label for nuts, gluten, dairy and caffeine. When in doubt, choose non-food items instead.
How much should I spend on supplies for a homemade basket?
Costs depend heavily on the items you choose and where you shop. Building a themed basket from scratch with a few quality items usually works better than filling it with many small things. Plan your main items first, then add fillers and finishing touches to round it out.
Is it better to buy a pre-made basket or build my own?
Building your own gives you more control over the theme, quality and personal touches. Pre-made baskets save time and can be a good option for busy seasons, but they tend to include generic items. If you want a faster route, Best Gift Baskets to Give This Season covers ready-made choices.
Conclusion
Knowing how to make gift baskets for Christmas comes down to a clear theme, a container that fits your items, and a simple arrangement method: filler, anchor, layers, focal piece, then wrap. Plan your sizes, check for dietary needs, and keep perishable items fresh until delivery. Once you have made one basket, the next one goes faster, and you can tailor each one to the person receiving it.
Ready to choose one?
About Lauren Holland
Lauren Holland is part of our editorial team and reviews and edits our christmas gifts by budget & occasion guides, checking product details against manufacturer specifications and owner feedback.